
| 일 | 월 | 화 | 수 | 목 | 금 | 토 |
|---|---|---|---|---|---|---|
| 1 | 2 | 3 | 4 | 5 | 6 | |
| 7 | 8 | 9 | 10 | 11 | 12 | 13 |
| 14 | 15 | 16 | 17 | 18 | 19 | 20 |
| 21 | 22 | 23 | 24 | 25 | 26 | 27 |
| 28 | 29 | 30 | 31 |
- Import
- Calendar
- REST
- MariaDB
- ColorPicker
- Widget
- react
- Schedule
- exceldata
- Excel
- grid.js
- mendix
- non-persistable
- TreeNode
- KakaoLogin
- customlogin
- daterangepicker
- externaldatabase
- Expose
- javaaction
- Java
- Today
- Total
Mendix개발일지
[Mendix] selectBox Widget 구현 본문
도대체가 이놈의 Mendix 위젯은 지원안되는 부분이 너무많다… 물론 Mendix의 기본기능만 복잡하지 않은 요구사항을 만족 시킬 수 있다면 나쁘지는 않다… 하지만
어제 나온 selectBox 요구사항을 충족시키고 싶어서 React의 SelectBox를 하나 만들어봤다.
- Microflow를 사용해서 원하는 데이터만 가져올 것이다.
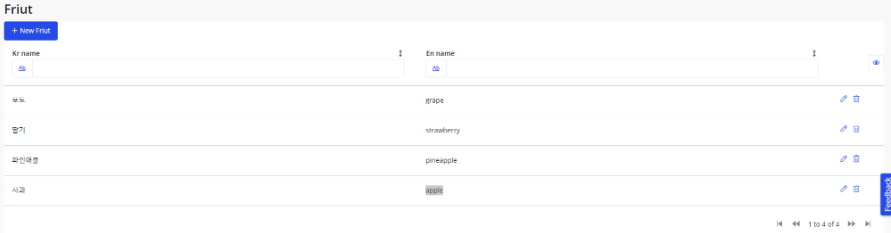
- 예로 과일이면 grape, strawberry, pineapple, apple이 있다고 한다면
- apple이 포함된 과일만 가져온다.
- selectBox에 데이터를 표시하고싶다.
그러면 시작해보겠다…
일단은 우리가 사용할 데이터 부터 만들어 주었다.
그런다음 React 를 사용해서 SelectWidget을 하나만들었다 아래의 소스코드는 SelectBox를 만드는 소스코드이다.
React 부분이 궁금하다면 Custom Widget, React Widget with Library이 두개 정리해둔것을 본다면 이해하는데 도움이 될것이다. 또한 ReactSelect가 궁금하다면 React Select Docs 에서 찾아본다면 쉬울것이다.
import { ReactElement, createElement, useEffect, useState } from "react";
import { SelectboxContainerProps } from "../../typings/SelectboxProps";
import styled from "styled-components";
import Select from "react-select";

const StyledSelect = styled(Select)`
    width: 150px;
`;

export interface friutProps {
    value: string;
    label: string;
}

interface ItemWithSymbol {
    [key: symbol]: any; // Symbol(mxObject)
}
function handleuserData(item: ItemWithSymbol): any {
    const symbols = Object.getOwnPropertySymbols(item);
    const mxObject = item[symbols[0]];
    const KrName: string = mxObject.jsonData.attributes.KrName.value;
    const EnName: string = mxObject.jsonData.attributes.EnName.value;
    return { KrName, EnName };
}
const SelectBox = (props: { options: friutProps[] }) => {
    return <StyledSelect placeholder={"fruits"} options={props.options} onChange={e => console.log(`${e}`)} />;
};

export function HelloWorldSample({ friutData }: SelectboxContainerProps): ReactElement {
    const [fruitData, setFruitData] = useState<friutProps[]>([]);
    useEffect(() => {
        if (friutData.items) {
            const tempItems = friutData.items.map((item: any) => {
                const itemWithSymbols: ItemWithSymbol = item;
                const result = handleuserData(itemWithSymbols);
                return { label: result.KrName, value: result.EnName }; // Create sub-array for each row
            });
            setFruitData(tempItems);
        }
        // 의존성을 가지고있어서 값이 업데이트 된다면 UseEffect함수실행
    }, [friutData.items]);

    return <SelectBox options={fruitData}></SelectBox>;
}
Build를 해주고 SelectBox를 추가해보았다. Properties로는 Datasource만 간단하게 주었다.

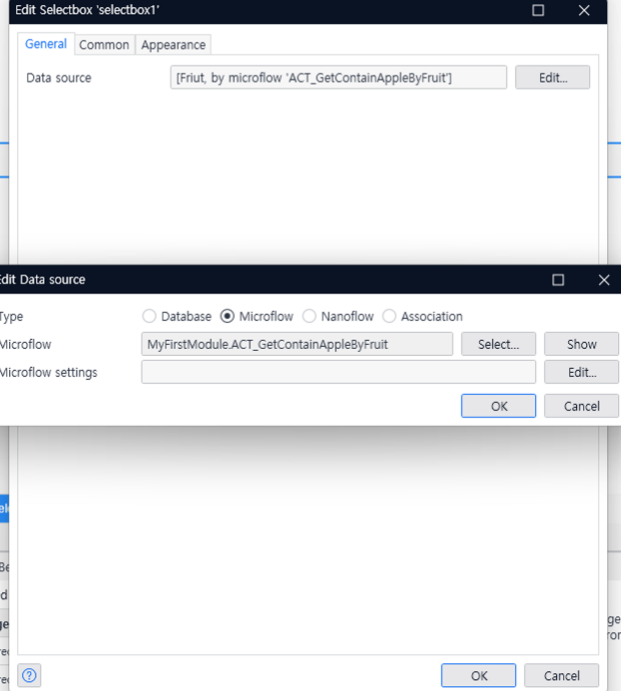
Microflow를 본다면 사전에 입력한 Fruit데이터를 가져온다.
그리고 List를 만들어주고 ‘Apple’이라는 String이 포함되어있다면 List에 넣어준다는 로직을 만들었다.

아래는 실제결과물이다.

추가사항
💡 데이터를 받고 추가하는 상황에서 데이터 추가 되지않는 상황이 발생했다…그래서 어떤부분을 체크해봐야 되는지 살펴보겠다.
중요한 부분이 [widgetName].xml 이다. 이부분의 property를 사용해야지만 Mendix에서 읽을 수 있기 때문이다. 설명이 무슨 소리인지 살펴보도록 하겠다…
아래는 하나의 예시이다.
Mendix에서 데이터를 selectboxData로 받아오고 데이터 수정을 위해서 selectAttribute 를 사용한다.
xml은 @Mendix/widget을 생성할때 자동으로 생성해주는 파일이다.
Mendix의 property와 react를 연결해주는 거라고 봐도 된다.
왜냐하면 React에서만 사용하는 변수를 만들면은 Mendix는 모르기 때문에 xml에 정의된 selectboxData를 파라미터로 받아서 사용해야된다.
<?xml version="1.0" encoding="utf-8"?>
<widget id="mendix.selectbox.SelectBox" pluginWidget="true" needsEntityContext="true" offlineCapable="true"
        supportedPlatform="Web"
        xmlns="http://www.mendix.com/widget/1.0/" xmlns:xsi="http://www.w3.org/2001/XMLSchema-instance"
        xsi:schemaLocation="http://www.mendix.com/widget/1.0/ ../node_modules/mendix/custom_widget.xsd">
    <name>Select Box</name>
    <description>My widget description</description>
    <icon/>
    <properties>
        <propertyGroup caption="General">
            <propertyGroup caption="Box Data source">
                <property key="selectboxData" type="datasource" isList="true" required="true">
                    <caption>Data source</caption>
                    <description />
                </property>
            </propertyGroup>
            <propertyGroup caption="Attr Data source">
                <property key="selectAttribute" type="attribute">
                    <caption>Attribute (path)</caption>
                    <description/>
                    <attributeTypes>
                        <attributeType name="String"/>
                    </attributeTypes>
                </property>
            </propertyGroup>
        </propertyGroup>
    </properties>
</widget>
그래서 React의 소스코드를 보면 selectboxData에 들어있는 데이터를 가공해서 보여주고 selectAttribute를 사용해서 selectboxData에 들어있는 string 데이터를 다루고 있다. 만약 selectAttribute 이부분을 React로 const [resultString, setResultString] = useState(””); 이런식으로 해주었다면 Mendix에서 읽지 못한다.
그러니 selectAttribute.setValue()를 사용해서 Mendix Property에서 파라미터로 넘긴 것을 사용해야 된다.
import { createElement, useState, useEffect } from "react";
import styled from "styled-components";
import Select from "react-select";

const StyledSelect = styled(Select)`
    width: 150px;
`;
function handleuserData(item) {
    const symbols = Object.getOwnPropertySymbols(item);
    const mxObject = item[symbols[0]];
    const name = mxObject.jsonData.attributes.name.value;
    return { name };
}
export function SelectComponent({ selectboxData, selectAttribute }) {
    const [selectData, setSelectData] = useState([]);

    const onChangeAttr = (v, a) => {
        console.log(v, a);
        selectAttribute.setValue(v.value);
        return v.value;
    };
    useEffect(() => {
        if (selectboxData.items) {
            const tempItems = selectboxData.items.map(item => {
                const itemWithSymbols = item;
                const result = handleuserData(itemWithSymbols);
                return { label: result.name, value: result.name }; // Create sub-array for each row
            });
            setSelectData(tempItems);
        }
    }, [selectboxData]);

    // useEffect(() => {}, [selectAttribute.value]);
    return (
        <div>
            <StyledSelect
                placeholder={"fruits"}
                options={selectData}
                onChange={onChangeAttr}
                defaultValue={selectAttribute.value}
            />
        </div>
    );
}
'Mendix' 카테고리의 다른 글
| [Mendix] React TreeNode (0) | 2024.05.14 |
|---|---|
| [Mendix] TreeNode (0) | 2024.05.14 |
| [Mendix] React Widget with Library (0) | 2024.05.14 |
| [Mendix] Custom Widget (0) | 2024.05.14 |
| [Mendix] multi file upload (0) | 2024.05.14 |


